Starling简单范例
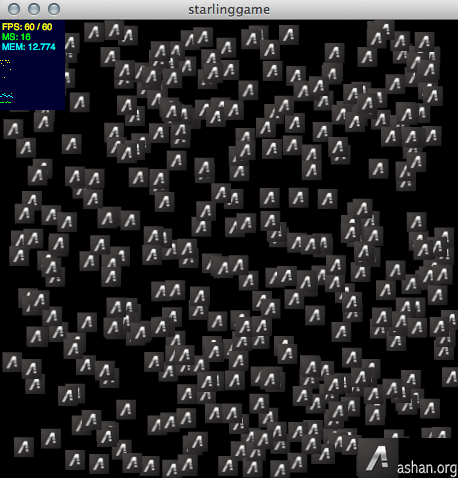
这篇文章中我为大家带来了一个极其混乱的demo,说极其混乱是因为他的效果,你看上图就非常明白了。OK,下面我们来说一说实现这400个logo同屏的具体混乱运动的具体办法。首先我要感谢Starling框架,是它让我非常容易的创建了这样一个demo来向大家展示stage3D的惊人效率。
因为在这个demo中没有任何交互的内容,所以我选了Starling中一个比较轻量级的类Image来作为我图像的承载器,同时为了方便的记录每个logo的运动参数,我对Image类进行了小小的修改。仅仅是一个扩展而已,打开来看一下这个ImageBox类。
package
{
	import starling.display.Image;
	import starling.textures.Texture;

public class ImageBox extends Image
{

	public var _speedX:Number = 0;
	public var _speedY:Number = 0;

	public function ImageBox(texture:Texture,_x:Number,_y:Number)
	{
		super(texture);

		this._speedX = _x;
		this._speedY = _y;
	}
}


}
在这个类中,我仅仅是扩展了两个属性,也仅仅是为了记录他们的X,Y轴偏移量。这样我就方便了后面动画的操作。然后我们来编写这个demo中最重要的一个类GameMain。你会发现这个名字或许有些眼熟,因为我在上一篇文章《Starling启动方式》中用到过这个类。这次我们就将这个类来完整的编写好。代码如下:
package
{
	import flash.display.Bitmap;
	import flash.display.BitmapData;
	import flash.display.Loader;
	import flash.display.LoaderInfo;
	import flash.display.Shape;
	import flash.events.Event;
	import flash.net.URLRequest;

import starling.display.Image;
import starling.display.Sprite;
import starling.events.EnterFrameEvent;
import starling.events.Event;
import starling.textures.Texture;

public class GameMain extends Sprite
{
	private var _texture:Texture;
	private var _imageBox:Vector.<ImageBox> = new Vector.<ImageBox>;
	private var _max_box:uint  = 0;

	public function GameMain()
	{
		var loader:Loader = new Loader();
		loader.contentLoaderInfo.addEventListener(flash.events.Event.COMPLETE,
			load_complete,false,0,true);
		loader.load( new URLRequest("20px.jpg") );

	}
	private function load_complete(evt:flash.events.Event):void
	{
		var bd:BitmapData = (LoaderInfo(evt.currentTarget).content as Bitmap).bitmapData;
		//
		this._texture = Texture.fromBitmapData( bd );
		var i:uint = 0;
		var t:uint = 400;
		while( i < t )
		{
			var sx:Number = 6 * Math.random() -3;
			var sy:Number = 6 * Math.random() -3;
			var imagebox:ImageBox = new ImageBox(this._texture, sx, sy);
			imagebox.x = 440 * Math.random();
			imagebox.y = 440 * Math.random();
			this.addChild( imagebox );
			this._imageBox.push( imagebox );
			imagebox = null;
			//
			i++;
		}
		this._max_box = this._imageBox.length;

		stage.addEventListener(starling.events.Event.ENTER_FRAME,onFrame);
	}
	public function onFrame(evt:EnterFrameEvent):void
	{
		var i:uint = 0;
		while( i < this._max_box )
		{
			this._imageBox[i].x += this._imageBox[i]._speedX;
			this._imageBox[i].y += this._imageBox[i]._speedY;

			if(this._imageBox[i].x < 0 || this._imageBox[i].x > 440 )
			{
				this._imageBox[i]._speedX *= -1;
			}
			if(this._imageBox[i].y < 0 || this._imageBox[i].y > 440 )
			{
				this._imageBox[i]._speedY *= -1;
			}
			//
			i++;
		}
	}
}


}
这段代码未作任何的优化及修改,你看到的是我最原始的代码编写内容。我在这里想告诉你的有两点,第一,你可以继续使用addChild这样的方法来制作你的程序,这样的接口也是和原生方法相近。第二,我希望你注意这段代码中的Event事件,因为用到了原生系统级Event和Starling中的Event事件。所以你要对此有所不同的处理。至于其他的逻辑,我想你可能在flashplayer 9的时代早已写过。
最后我们通过文档类来启动我们这个小小的demo。
package
{
	import flash.display.Bitmap;
	import flash.display.BitmapData;
	import flash.display.Loader;
	import flash.display.Sprite;
	import flash.display.StageAlign;
	import flash.display.StageScaleMode;
	import flash.events.Event;
	import flash.net.URLRequest;

import starling.core.Starling;

[SWF(width="460", height="460", frameRate="60", backgroundColor="#000000")]
public class starlinggame extends Sprite
{

	private var _myStarling:Starling;

	public function starlinggame()
	{
		stage.align = StageAlign.TOP_LEFT;
		stage.scaleMode = StageScaleMode.NO_SCALE;
		//
		Starling.multitouchEnabled = false;

		this._myStarling = new Starling(GameMain,stage);
		this._myStarling.antiAliasing = 16;
		this._myStarling.enableErrorChecking = false;

		this._myStarling.start();
		//
		addChild( new Stats() );


	}

}


}
OK!当你将所有的代码全部编写好之后你就可以测试你的内容了。具体的效果大家可以下载源码看一看。点击下载源码
